이미지 관련 태그 & form 형식
1. 이미지 관련 태그들
2. form
3. 기타 링크
1. 이미지 관련 태그들
1-1. img
이미지 리소스에 대한 설정 태그로 로컬 폴더 내에 있는 이미지를 가져와서 사이즈를 설정해 준다.
<img
        src="../23.06.14/imgs/british-shorthair-gf562d3f63_1280.jpg"
        width="300px"
        height="500px"
        alt="이미지 없음"
/>
1-2. video
저장된 비디오 소스파일을 로컬폴더 내에서 가져와서 설정한다.
controls 속성은 플레이버튼이나 정지버튼과 같은 비디오를 실행시킬 수 있는 제어기에 대해 표시하는 속성
loop 속성은 video를 반복시켜 주는 속성이다.
autoplay 속성은 화면이 시작하면 자동으로 재생되게 해 준다.
muted 속성은 비디오의 소리가 음소거로 설정됩니다.
<video
        src="../23.06.14/video/cat_-_56375 (540p).mp4"
        controls
        loop
        autoplay
        muted
></video>
1-3. audio
audio 태그는 사운드에 대한 태그로 사운드를 들리게 해 줍니다.
<audio
        src="../23.06.14/sound/reflected-light-147979.mp3"
        controls
        loop
        autoplay
        muted
></audio>
1-4. iframe
iframe는 효과적으로 다른 HTML 페이지를 현재 페이지에 포함시키는 중첩된 브라우저,
iframe 요소를 이용하면 다른 페이지를 불러와서 삽입가능하다.
 <iframe
        width="560"
        height="315"
        src="https://www.youtube.com/embed/Hax9ZcOteZ0"
        title="YouTube video player"
        frameborder="0"
        allow="accelerometer; autoplay; clipboard-write; encrypted-media; gyroscope; picture-in-picture; web-share;"
        allowfullscreen
 ></iframe>
2. form
2-1. 용어
form 태그 : 폼 속성을 이용하여 전송할 때 어디로 보내야 하는지 그리고 어떤 방법으로 보낼지 결정,
form 태그 속성들
action : 폼을 전송할 서버 쪽 스크립트 파일 지정
name : 폼을 식별하기 위한 이름지정
accept-charset : 폼 전송에 사용할 문자 인코딩 지정
target : action에서 지정한 스크립트 파일을 현재 창이 아닌 다른 위치에 열도록 지정
method : 폼을 서버에 전송할 http 메서드를 정합니다.
2-2. regist.html
<html lang="ko">
  <head>
    <meta charset="UTF-8" />
    <meta name="viewport" content="width=device-width, initial-scale=1.0" />
    <title>회원가입</title>
  </head>
  <body>
    <div id="root">
      <form action="">
        <!-- <form action="https://www.google.com/search"> -->

        <fieldset>
          <legend>필수정보</legend>
          <label for="id">아이디</label>
          <input type="text" name="id" id="id" />
          <input type="password" name="pw" id="pw" />
        </fieldset>

        <input type="number" name="age" placeholder="나이" />
        <input type="email" name="email" placeholder="메일주소" />
        <input type="checkbox" id="married" />
        <input type="radio" name="gender" id="man" value="man" />
        <label for="man">남자</label>
        <input type="radio" name="gender" id="woman" value="woman" />
        <label for="woman">여자</label>
        <input type="married" name="age" placeholder="나이" />
        <input type="date" name="birthday" />
        <label for="birthday">생일</label>
        <input type="color" name="color" id="color" />
        <textarea
          name="desciption"
          id="desciption"
          cols="30"
          rows="10"
          placeholder="자기소개"
        ></textarea>

        <select name="like" id="like">
          <option value="apple">사과</option>
          <option value="banana">바나나</option>
          <option value="computer">컴퓨터</option>
          <option value="phone">스마트폰</option>
        </select>
        <!-- <input type="text" name="q" placeholder="q" />
        <input type="text" name="oq" placeholder="oq" />
        <input type="text" name="aqs" placeholder="aqs" />
        <input type="text" name="sourceid" placeholder="sourceid">
        <input type="text" name="ie" placeholder="ie">
        <button>보내기</button> -->
        <!-- 입력된 데이터를 전부 지워준다. -->
        <button type="rerset">보내기</button> <br />
      </form>
      <label for="pw">비밀번호</label>
    </div>
  </body>
</html>
2-3. 출력
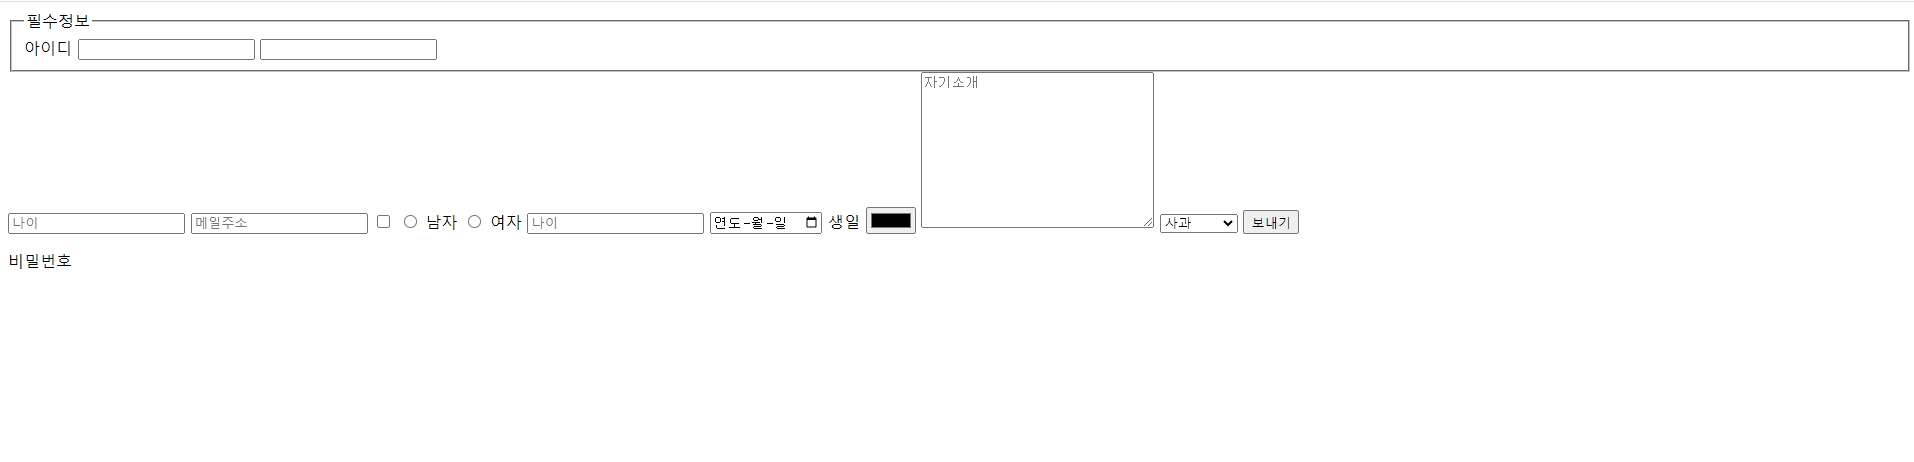
위 코드를 출력해 본 결과 값이다. 위의 이미지를 통해 어떤 식으로 태그들이 동작하는지 알 수 있다.
2-4. fildset , legend

<fieldset>
          <legend>필수정보</legend>
          <label for="id">아이디</label>
          <input type="text" name="id" id="id" />
          <input type="password" name="pw" id="pw" />
</fieldset>
label 형식이 input 타입의 id를 찾아서 아이디와 pw를 하나의 필드 셋으로 묶어주는 기능을 하고 있다. 이때 legend 태그를 사용하면 박스 위에 제목으로 지정할 수 있다.
2-5. input, textarea

 	<input type="number" name="age" placeholder="나이" />
        <input type="email" name="email" placeholder="메일주소" />
        <input type="checkbox" id="married" />
        <input type="radio" name="gender" id="man" value="man" />
        <label for="man">남자</label>
        <input type="radio" name="gender" id="woman" value="woman" />
        <label for="woman">여자</label>
        <input type="married" name="age" placeholder="나이" />
        <input type="date" name="birthday" />
        <label for="birthday">생일</label>
        <input type="color" name="color" id="color" />
        <textarea
          name="desciption"
          id="desciption"
          cols="30"
          rows="10"
          placeholder="자기소개"
        ></textarea>

        <select name="like" id="like">
          <option value="apple">사과</option>
          <option value="banana">바나나</option>
          <option value="computer">컴퓨터</option>
          <option value="phone">스마트폰</option>
        </select>
        <!-- <input type="text" name="q" placeholder="q" />
        <input type="text" name="oq" placeholder="oq" />
        <input type="text" name="aqs" placeholder="aqs" />
        <input type="text" name="sourceid" placeholder="sourceid">
        <input type="text" name="ie" placeholder="ie">
        <button>보내기</button> -->
        <!-- 입력된 데이터를 전부 지워준다. -->
        <button type="rerset">보내기</button> <br />
      </form>
      <label for="pw">비밀번호</label>
input 태그 : 사용자로부터 입력을 받을 수 있는 입력 필드를 정의할 때 사용
radio 속성 : input 태그의 radio 속성으로 타입에는 id, name, checked 가 있다. 이때 설정하는 속성으로 id형식, name 형식, 체크박스 형식으로 출력이 된다. 위의 그림에선 checked 형식으로 남/여의 체크박스를 만들어주었다.
textarea 태그 : 글을 작성할 수 있게 해주는 태그
3. 기타 링크
* 기타 링크 : 라이선스 무료 이미지 사이트
놀라운 무료 이미지 - Pixabay - Pixabay
어디서든 사용할 수 있는 무료 미디어 Pixabay is a vibrant community of creatives, sharing royalty-free images, videos, audio and other media. All content is released by Pixabay under the Content License, which makes it safe to use without ask
pixabay.com