반응형

1. 클론 페이지 5


2. 클론 페이지 6


3. 소스코드


금요일이 되어 드디어 마지막, html css 클론 시간이었다. 경일게임 아카데미의 footer 부분 이외에 마지막 부분 이외에 커리큘럼 홈페이지와 가이드 홈페이지를 클론을 진행하였다. 


1. 클론 페이지 5


1. 클론 할 화면 - 1 


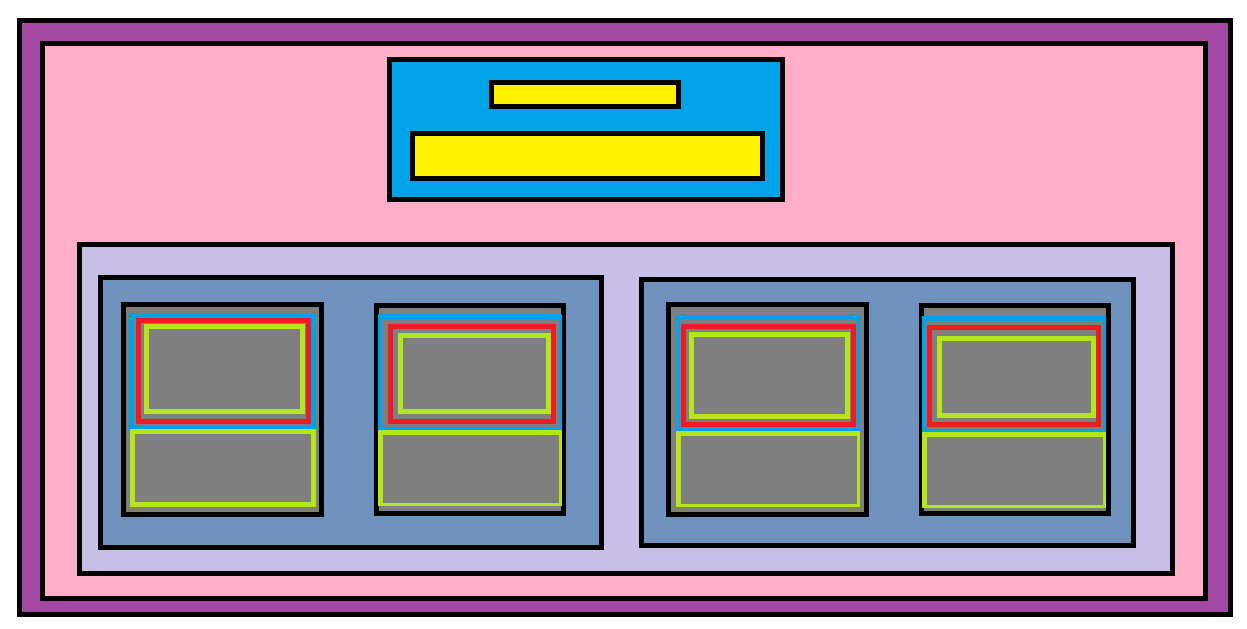
커리큘럼 홈페이지를 클론 하기 앞서 어떤 식으로 클래스를 감쌓주고 텍스트박스와 item요소들을 지정할지 고민하였다. 반응형 웹으로 개발하기 위해, 화면을 줄이면서 어떤 식으로 반응하는지 살펴보았다. 화면이 특정 px 보다 작아졌을 시 네 가지 아이템이 보이다가 두 가지 아이템만 보이도로 반응하였다. 이를 구현하기 위하여 전체를 묶어주는 컨테이너박스 아래에 title-box와 box-wrapper로 감쌓주었고, box-wrapper 아래에 div > class box > class square, p 태그를 이용하여 두 개를 div로 묶음처리하여 웹이 작아진 상황에 4개에서 2개가 보이는 반응형 웹을 개발하였다. 


1. 예상 클론 레이아웃 - 1
1. 클론 후 화면 - 1


2. 클론 페이지 6


2. 클론 할 화면 - 2
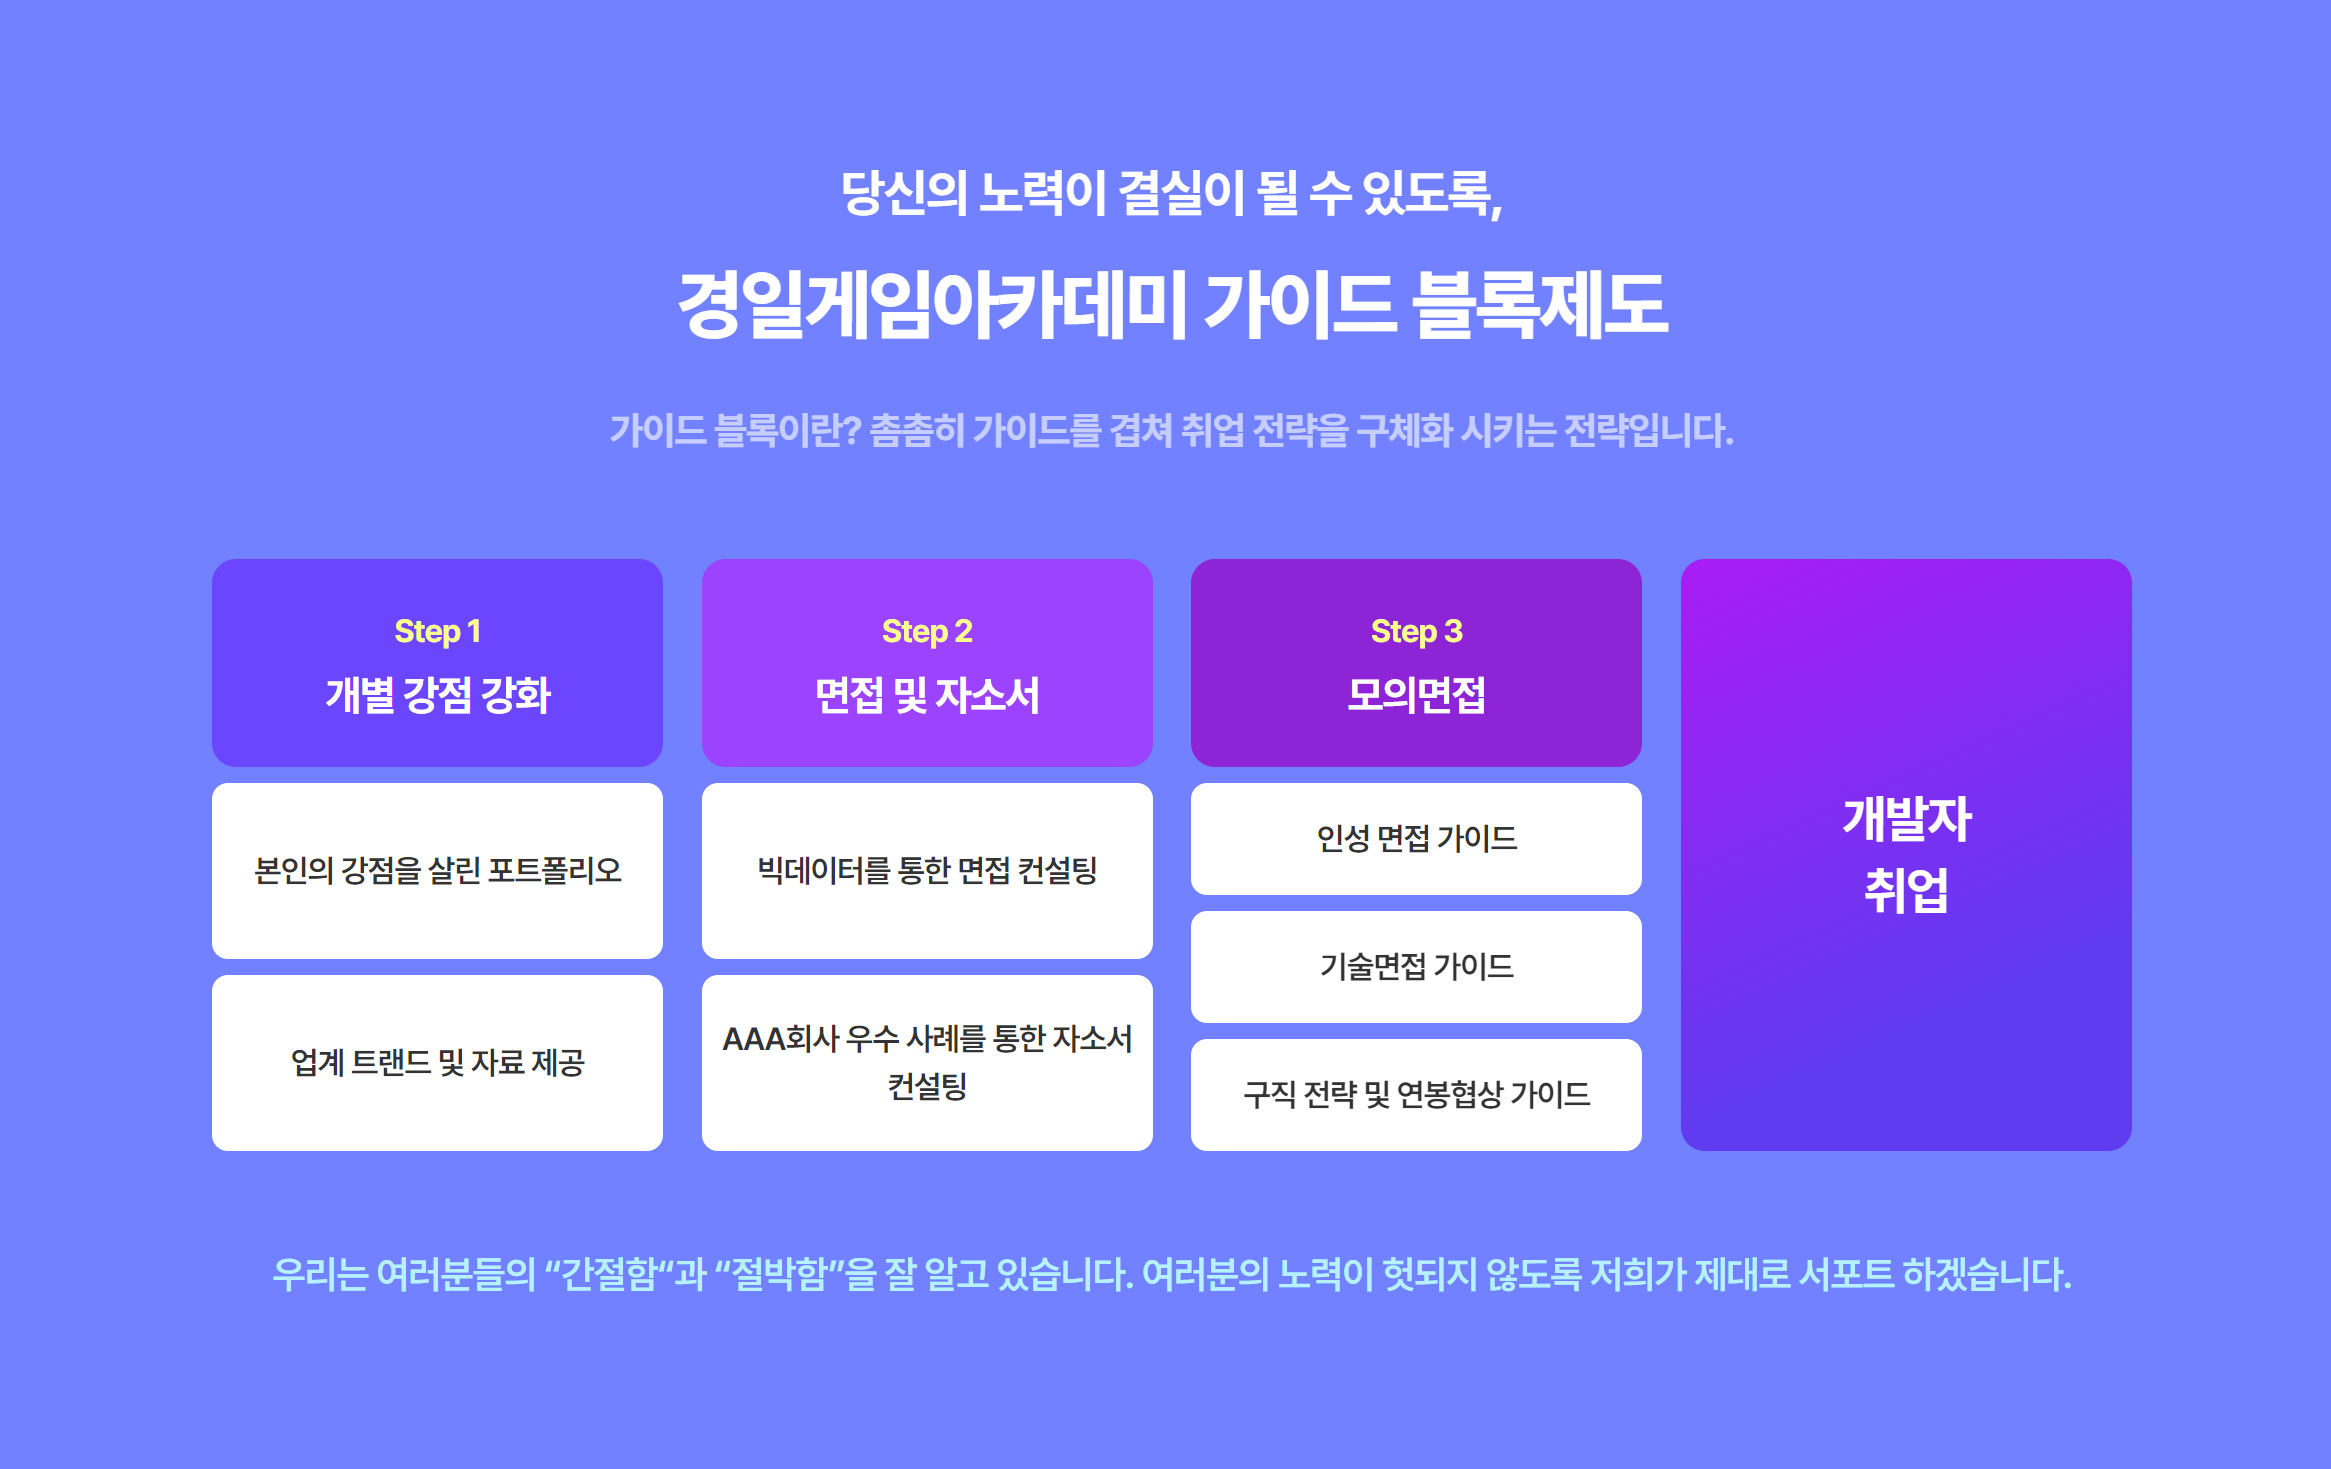
 

가이드 페이지를 클론 하면서 살짝 까다로웠던 점은 전체를 묶어준 이후 flex 형태로 박스들을 배치하였지만, 각각의 아이템 박스들이 3, 3, 4, 1 개의 아이템을 가지고 있어 그대로 속성을 적용한다면 화면이 깨진다는 것이었다. 이를 해결하기 위해 부모속성과 자식 속성에 flex를 모두 부여하고 각각의 차일드를 찾아서 직접 색을 부여하였다.


2. 예상 클론 레이아웃 - 2

2. 클론 후 화면 - 2


일주일 동안 여러 가지의 클론을 진행하면서 html, css의 기본적인 요소들과 속성들을 이해하였고, 인라인과 블록형식, 반응형 웹을 개발할 때 어떤 식으로 각각의 아이템박스들을 묶어줄지 고민하였다. 이를 바탕으로 내가 원하는 포지션에 원하는 것들을 적절히 배치하여 디자인하여 웹에서 보이는 부분을 꾸밀 수 있을 것 같다. 특히 flex 부분과 마진과 패딩에 간격에 대한 것들이 이해가 부족하여 이 부분을 공부한다며 더 좋을 것 같다. 


3. 소스코드


3. curriculum, html

<div id="curriculum">
        <div class="container">
          <div class="title-box">
            <h1>KYUNGIL CURRICULM</h1>
            <h2>여러분이 준비하시게 될 것</h2>
          </div>
          <div class="box-wrapper">
            <div>
              <div class="box">
                <div class="square">
                  <div><div class="img"></div></div>
                </div>
                <p>
                  3가지 <br />
                  포트폴리오
                </p>
              </div>
              <div class="box">
                <div class="square">
                  <div><div class="img"></div></div>
                </div>
                <p>
                  Git을 활용한 <br />
                  업무관리
                </p>
              </div>
            </div>
            <div>
              <div class="box">
                <div class="square">
                  <div><div class="img"></div></div>
                </div>
                <p>
                  경쟁력 있는 <br />
                  자소서와 기술문서
                </p>
              </div>
              <div class="box">
                <div class="square">
                  <div><div class="img"></div></div>
                </div>
                <p>
                  모의면접을 통한 <br />
                  1:1 피드백
                </p>
              </div>
            </div>
          </div>
        </div>
      </div>


4. curriculum.css


#curriculum {
  background-color: rgb(20, 142, 218);
  padding: 7rem 0;
  /* display: none; */
}

#curriculum .box-wrapper {
  margin-top: 6rem;
}

#curriculum .box-wrapper,
#curriculum .box-wrapper > div {
  display: flex;
  gap: 1rem;
  flex: 1;
  flex-wrap: wrap;
  min-width: 30rem;
}

#curriculum .box-wrapper .box {
  flex: 1;
  border-radius: 2rem;
  overflow: hidden;
}

#curriculum .box-wrapper .box p {
  background-color: beige;
  padding: 2rem 0;
  margin: 0;
  font-size: 1.3rem;
  font-weight: 900;
  text-align: center;
}

.img {
  width: 100%;
  height: 100%;
  background-color: yellow;
}

/* @media only screen and (min-width: 30rem) {
} */


3. guide.html

<div id="guide">
        <div class="container">
          <div class="text-box">
            <h1>
              <span>당신의 노력이 결실이 될 수 있도록,</span><br />
              경일게임아카데미 가이드 블록제도
            </h1>
            <p>
              가이드 블록이란? 촘촘히 가이드를 겹쳐 취업 전략을 구체화 시키는
              전략입니다.
            </p>
          </div>
          <div class="step">
            <div class="box-wrapper">
              <div class="item-box">
                <div>
                  <h2>Step1</h2>
                  <h1>개별 강점 강화</h1>
                </div>
                <div>본인의 강점을 살린 포트폴리오</div>
                <div>업계 트랜드 및 자료 제공</div>
              </div>
              <div class="item-box">
                <div>
                  <h2>Step2</h2>
                  <h1>면접 및 자소서</h1>
                </div>
                <div>빅데이터를 통한 면접 컨설팅</div>
                <div>AAA회사 우수 사례를 통한 자소서 컨설팅</div>
              </div>
            </div>
            <div class="box-wrapper">
              <div class="item-box">
                <div>
                  <h2>Step3</h2>
                  <h1>모의면접</h1>
                </div>
                <div>인성 면접 가이드</div>
                <div>기술면접 가이드</div>
                <div>구직 전략 및 연봉협상 가이드</div>
              </div>
              <div class="item-box">
                <div class="bg-gradient">
                  <h1>개발자 <br />취업</h1>
                </div>
              </div>
            </div>
          </div>
          <div class="footer">
            우리는 여러분들의 “간절함“과 “절박함”을 잘 알고 있습니다. 여러분의
            노력이 헛되지 않도록 저희가 제대로 서포트 하겠습니다.
          </div>
        </div>
      </div>


3. guide.css


#guide div {
  /* border: 1px solid black; */
}

#guide {
  background-color: lightskyblue;
  padding: 7rem;
}

#guide .text-box {
  text-align: center;
  color: white;
  margin-bottom: 3rem;
}

#guide .text-box span {
  font-size: 1.3rem;
}

#guide .text-box p {
  font-weight: 900;
  opacity: 0.5;
}

#guide .step {
  display: flex;
  flex-wrap: wrap;
  gap: 1rem;
}

#guide .step .box-wrapper {
  flex: 1;
  display: flex;
  flex-wrap: wrap;
  gap: 1rem;
}

#guide .step .box-wrapper .item-box {
  flex: 1;
  display: flex;
  flex-direction: column;
  gap: 0.5rem;
  text-align: center;
}

#guide .step .box-wrapper .item-box div {
  padding: 1rem 0.5rem;
  flex: 1;
  display: flex;
  justify-content: center;
  flex-direction: column;
  align-items: center;
  border-radius: 1rem;
  background-color: white;
  font-weight: 900;
}

#guide .step .box-wrapper .item-box h1,
#guide .step .box-wrapper .item-box h2 {
  margin: 0;
}

#guide .step .box-wrapper .item-box h2 {
  font-size: 1.3rem;
  margin-bottom: 0.5rem;
  color: yellow;
}

#guide .step .box-wrapper .item-box h1 {
  color: white;
}

#guide .step .box-wrapper:first-child .item-box:first-child div:first-child {
  background-color: cadetblue;
}

#guide .step .box-wrapper:first-child .item-box div:first-child {
  background-color: pink;
}

#guide .step .box-wrapper .item-box:first-child div:first-child {
  background-color: blue;
}

#guide .step .box-wrapper:last-child .item-box:last-child div:first-child {
  /* background-color: brown; */
  /* background: linear-gradient(to bottom, red, blue); */
}

#guide .step .bg-gradient {
  background: linear-gradient(to bottom, red, blue);
}

#guide .footer {
  text-align: center;
  font-size: 1.2rem;
  font-weight: 900;
  margin-top: 4rem;
  color: blue;
  opacity: 0.5;
}


반응형
반응형


1. 클론 할 화면


2. 예상 클론 레이아웃


3. 클론 후 화면


경일게임아카데미 클론코딩


오늘은 경일 게임 아카데미 홈페이지 클론코딩 3번째 페이지를 진행하였다. 

오늘 클론을 하면서 배운점은 화면에 대한 배치와 배치를 한 후 각각의 아이템에 대한 속성 값을 어떤 식으로 줘야 여러 개의 엘리먼트 값들에 한 번에 속성을 주는지와 애니메이션을 통해 글자박스들의 이동과 글자들의 색상 조절 등의 애니메이션을 주었다. 기본적으로 흐름을 이해하고, html에 속성을 주는 형식을 이해하는 것이 중요한 수업이었다. 


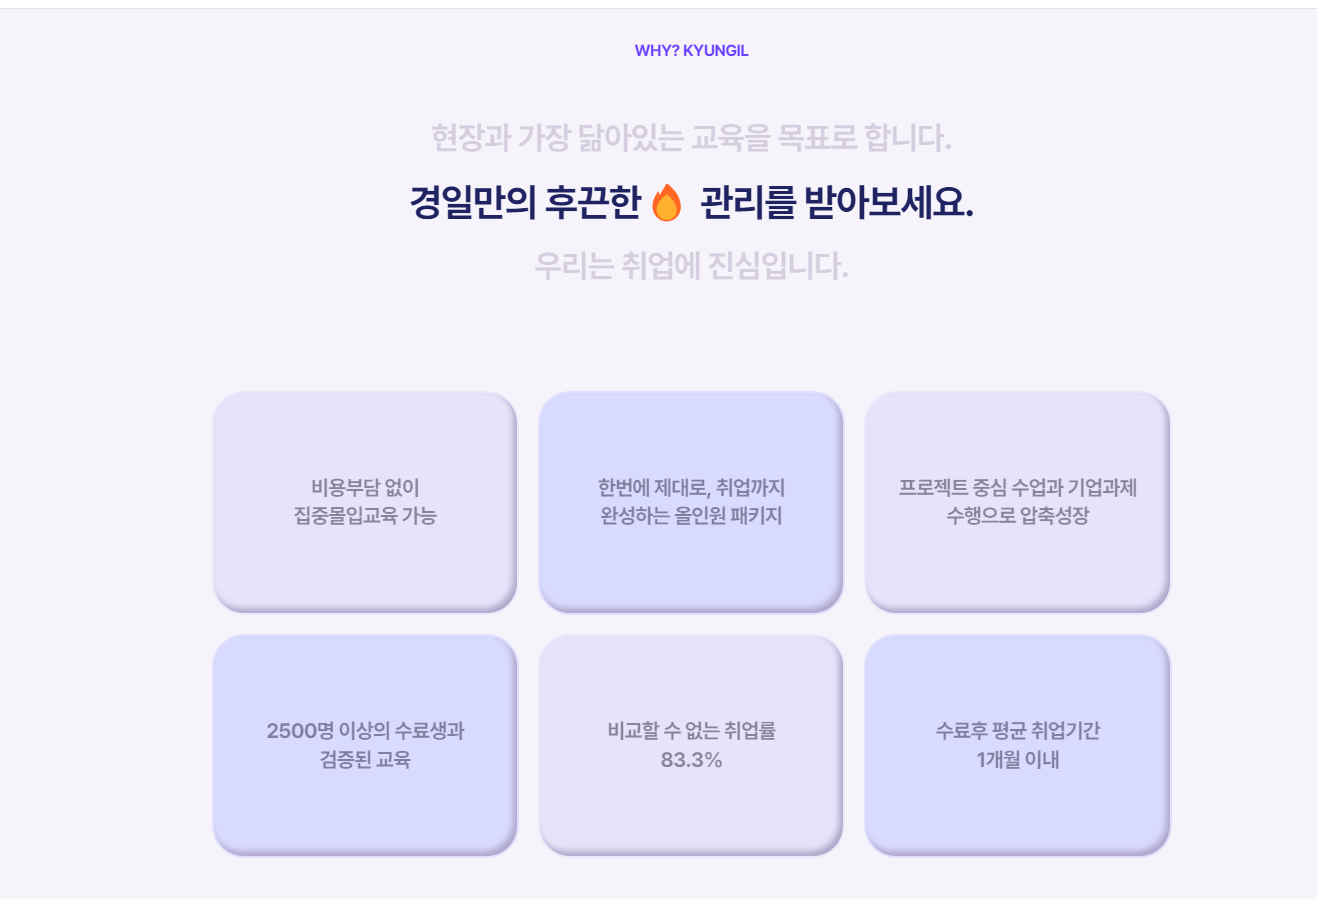
1. 클론 할 화면


위의 클론 할 홈페이지 화면을 바탕으로 예상되는 클론 레이아웃을 짜 보았다. 

첫 번 째로 전체적인 화면의 div id = why 아래 컨테이너로 전체 레이아웃을 감싸주었고, 그 아래 slide 되는 텍스트 부분과 

아래에 화면을 올리면 화면이 바뀌는 버튼 클래스로 묶어 주었다. 


2. 예상 클론 레이아웃


2-1. slide class

slide 부분에는 6개의 텍스트를 주었고, @keyframe slide 를 사용하여, 각각의 % 를 지정하였고, 흐린 화면 아래위 두 개와 중앙값 한 개에 대해 진하게 와 글씨를 크게 해 주는 css를 적용하였다. 특히 아래에서 위로 올라가는 화면을 진행하면서 키프레임 % 대해 어떻게 사용해야 할지 생각해 보았고,  text가 3개가 보여야 하기 때문에 글자 속성을 slide 박스 전체가 올라가면 안 되기 때문에 div 속성으로 감싸주어 특정 부분에 글씨가 커지고 진하게 보일 수 있도록 애니메이션을 지정하였다. 


slide 박스의 css

#why {
  margin: 7rem 0;
}

#why h1 {
  font-size: 1.2rem;
  font-weight: 900;
  text-align: center;
  color: blueviolet;
  margin: 4rem 0;
}

@keyframes slide {
  0% {
    transform: translateY(0);
  }
  6% {
    transform: translateY(-17.5%);
  }
  33.3% {
    transform: translateY(-17.5%);
  }
  39.3% {
    transform: translateY(-35%);
  }
  66.6% {
    transform: translateY(-35%);
  }
  72.6% {
    transform: translateY(-52%);
  }
  100% {
    transform: translateY(-52%);
  }
}

#why .slide {
  height: 14rem;
  overflow: hidden;
}

#why .slide div {
  animation: slide 5s linear infinite;
}

#why .slide h2 {
  font-size: 2.5rem;
  text-align: center;
  margin: 1rem 0;
  color: darkblue;
  opacity: 0.4;
}

@keyframes text1 {
  0% {
    opacity: 1;
    font-size: 3rem;
  }
  6% {
    opacity: 0.4;
    font-size: 2.5rem;
  }
  33.3% {
  }
  39.3% {
  }
  66.6% {
  }
  72.6% {
  }
  100% {
    opacity: 0.4;
    font-size: 2.5rem;
  }
}

#why .slide h2:nth-child(2) {
  animation: text1 5s linear infinite;
}

@keyframes text2 {
  0% {
    opacity: 0.4;
    font-size: 2.5rem;
  }
  6% {
    opacity: 1;
    font-size: 3rem;
  }
  33.3% {
    opacity: 1;
    font-size: 3rem;
  }
  39.3% {
    opacity: 0.4;
    font-size: 2.5rem;
  }
  66.6% {
  }
  72.6% {
  }
  100% {
    opacity: 0.4;
    font-size: 2.5rem;
  }
}

#why .slide h2:nth-child(3) {
  animation: text2 5s infinite;
}

@keyframes text3 {
  0% {
  }
  6% {
  }
  33.3% {
    opacity: 0.4;
    font-size: 2.5rem;
  }
  39.3% {
    opacity: 1;
    font-size: 3rem;
  }
  66.6% {
    opacity: 1;
    font-size: 3rem;
  }
  72.6% {
    opacity: 0.4;
    font-size: 2.5rem;
  }
  100% {
    opacity: 0.4;
    font-size: 2.5rem;
  }
}

#why .slide div h2:nth-child(4) {
  animation: text3 5s linear infinite;
}

@keyframes text4 {
  0% {
  }
  6% {
  }
  33.3% {
  }
  39.3% {
  }
  66.6% {
    opacity: 0.1;
    font-size: 2.5rem;
  }
  72.6% {
    opacity: 1;
    font-size: 2.6rem;
  }
  100% {
    opacity: 1;
    font-size: 2.6rem;
  }
}

#why .slide div h2:nth-child(5) {
  animation: text4 5s linear infinite;
}

슬라이드 박스를 구현한 후 버튼들에게 flex 속성을 주고 버튼의 item 들에 hover 속성을 부여하여 마우스가 위로 올라가면 다른 글자와 img 가 보이도록 만들었다. 이때 item 박스에 이미지들에게 동일한 규격의 사이즈를  주기 위해 obeject-fit contain 속성과 너비와 높이를 부여하여 각각의 이미지들에 동일한 속성의 사이즈를 적용하였다. 

#why .buttons {
  display: flex;
  justify-content: space-between;
  flex-wrap: wrap;
  gap: 1rem;
}

#why .buttons .item {
  height: 15rem;
  width: 32%;
  margin-bottom: 1rem;
  position: relative;
  border-radius: 3rem;
  text-align: center;
  background-color: skyblue;
  display: flex;
  justify-content: center;
  align-items: center;
  box-shadow: inset -0.2rem -0.2rem 0.2rem 0.2rem rgba(0, 0, 0, 0.2);
}

#why .buttons .item p {
  font-weight: 900;
  /* height: 15rem;
  display: flex;
  justify-content: center;
  align-items: center; */
}

#why .buttons .item > p {
  opacity: 0.5;
  font-size: 1.5rem;
}

#why .buttons .item div {
  opacity: 0;
  height: 15rem;
  background-color: white;
  position: absolute;
  top: 0;
  width: 100%;
  border-radius: 3rem;
  box-shadow: 0.5rem 0.5rem 1rem rgba(0, 0, 0, 0.2);
  display: flex;
  justify-content: center;
  align-items: center;
  flex-direction: column;
  transition: opacity 0.5s ease;
}

#why .buttons .item div img {
  width: 10rem;
  object-fit: contain;
  /* object-fit: 사이즈 전체 조정*/
  height: 6rem;
}

#why .buttons .item:nth-child(2n) {
  background-color: pink;
}

#why .buttons .item div p {
  font-size: 1.2rem;
  margin: 1.5rem;
}

#why .buttons .item div:hover {
  opacity: 1;
}


3. 클론 후 화면


3일차 개발을 진행하면서 점점 html과 css 사용법에 익숙해지는 것 같다. 아직, 미세한 조정과 이미지 배치를 자유자재로 하지 못하기 때문에 클론 개발 전에 어떤 식으로 틀을 잡고 틀 안에서 속성을 부여하고 개발할 지에 대해 생각해 보아야겠다.

반응형
반응형


1. Flex


1. Flex


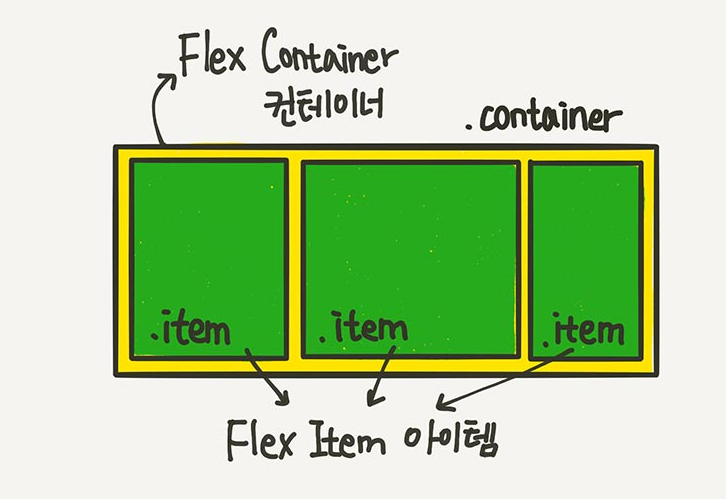
Flex 레이아웃은 Flex Container와 Flex items로 구성되어 있다. 

Flex의 속성들은 컨테이너에 적용하는 속성과 아이템에 적용하는 속성으로 나누어진다.

Container는 display, flex-flow,justify-content 속성을 사용할 수 있다.

items에는 order, flex, align-self 등의 속성이 있다. 


출처 : https://studiomeal.com/archives/197


Flex Container 속성들 


.flex-box {
  display: flex;
  gap: 10px;
  flex-wrap: wrap;
  justify-content: center;
  justify-content: space-around;
  justify-content: space-between;
  justify-content: space-evenly;
  height: 200px;
  align-items: center;
  align-items: stretch;

  flex-direction: column;
}


1-1. display 속성 : 

flex Container에선 display를 display : flex, display : inline-flex로 정의한다. 

flex : 블록 특성의 flex container, 

inline-flex : 인라인 특성의 flex container

여기서 flex 는 수직, inline-flex는 수평으로 쌓이게 되는데, display 설정은 item의 수직 수평이 아닌 컨테이너의 수직 수평임을 알아야 한다


출처 :https://studiomeal.com/archives/197


1-2. justify-content 속성 : 

justify-content: center; 진행 방향에 대해서 정렬을 합니다. end면은 끝부분에 맞추게 됩니다. 
justify-content: space-around; 콘텐츠를 기준으로 서로 같은 여백들을 가지고 있다.
justify-content: space-between; 일단 좌우 끝을 맞춘 후에 같은 간격으로 배치
justify-content: space-evenly; 모든 여백이 같은 크기로 맞춘다.


1-3. flex-wrap 

컨테이너가 더 이상 아이템을 담을 여유공간이 없을 때 아이템 줄 바꿈을 어떻게 할지 결정하는 속성이다.

wrap, nowrap, wrap-reverse 가 있다. 

wrap : 화면이 줄어드면 자동으로 아래 줄바꿈 해준다.

nowrap : 화면이 줄어들면 보이지 않게 된다. 

wrap-reverse : 화면이 줄어드면 자동으로 위로 줄바꿈 해준다.


etc.

공부하기 좋은 정리된 글이 있어서 링크 걸어둔다.

https://studiomeal.com/archives/197


이번에야말로 CSS Flex를 익혀보자

이 튜토리얼은 “차세대 CSS 레이아웃” 시리즈의 첫번째 포스트입니다. 이번에야말로 CSS Flex를 익혀보자 이번에야말로 CSS Grid를 익혀보자 벌써부터 스크롤의 압박이 느껴지고,‘좀 편안하게 누

studiomeal.com


반응형

'블록체인 개발' 카테고리의 다른 글

변수명 표기법  (0) 2023.06.27
Javascript Runtime  (0) 2023.06.26
선택자 및 속성  (0) 2023.06.15
이미지 관련 태그 & form 형식  (0) 2023.06.14
웹 브라우저란  (2) 2023.06.13

+ Recent posts